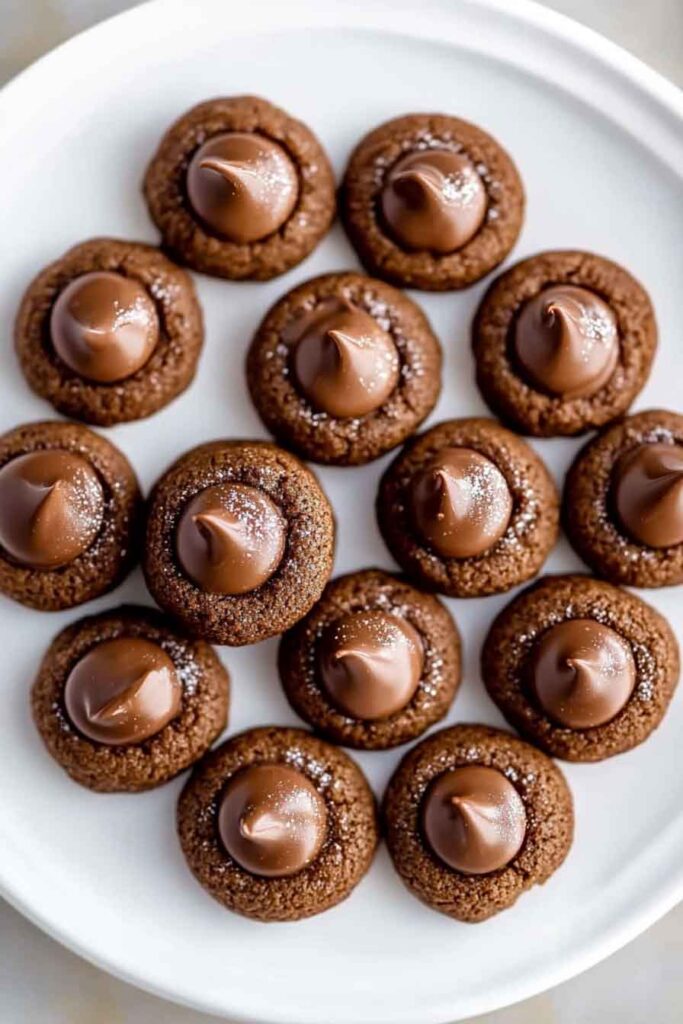
Chocolate Hershey Kiss Cookies
These cookies are soft, chocolatey, and topped with a sweet Hershey’s Kiss. They’re cute, simple, and totally delicious.
I made them for a holiday tray, and everyone loved them. The cookie base is rich and fudgy, and the Kiss on top? Perfectly melty and sweet.
They’re easy, festive, and perfect for gifting or sharing. Great for holidays, parties, or just a sweet treat. You’ll want to make a whole batch.
Let’s bake a batch of these classic cookies! Grab your Hershey’s Kisses—your new favorite cookie is waiting!
Why You’ll Love This Recipe
- A Timeless Classic: These cookies evoke cherished memories of baking with family, where the simple act of pressing a chocolate kiss into a warm cookie feels magical.
- Perfect Texture: The cookies are crafted to achieve a slightly crisp exterior with a tender, moist center that melts in your mouth. The Hershey’s Kiss adds a burst of creamy chocolate in every bite.
- Approachable for All Levels: Whether you’re a novice baker or a seasoned home cook, this recipe guides you through each step with precision, ensuring success even if it’s your first batch.
- Versatile and Adaptable: You can switch up the flavor profiles or add personal twists, like incorporating chopped nuts, flavored Kisses, or a hint of warm spices.
- Kid-Approved Fun: Little hands love to help press the Kisses into the cookies. This makes the recipe perfect for family baking days or holiday traditions.

What You Need to Know Before You Start
Prep Time & Cook Time:
- Prep Time: 20 minutes (including mixing and shaping the dough)
- Chill Time: 30 minutes (chilling the dough firms it up for perfect texture)
- Bake Time: 10-12 minutes (depending on oven and desired softness)
- Total Time: Approximately 1 hour
Servings:
This recipe yields about 24 cookies, making it perfect for a small gathering or a week’s worth of treats. If you’re baking for a larger crowd, the dough can be easily doubled without compromising texture or flavor.
Difficulty:
This recipe is straightforward, designed with a clear sequence of steps and minimal equipment needs. Even if you’re new to baking, you’ll find success here.
Required Kitchen Tools
To ensure a smooth baking experience, gather these essentials:
- Mixing Bowls: A large bowl for combining wet and dry ingredients, and a medium bowl for whisking dry ingredients.
- Electric Mixer: A hand or stand mixer will help cream the butter and sugar into a light, fluffy base.
- Measuring Tools: Accurate measuring cups and spoons are crucial for consistency.
- Baking Sheets: Lined with parchment paper or silicone mats to prevent sticking and promote even baking.
- Cooling Rack: Essential for allowing the cookies to cool completely without becoming soggy.
Optional but helpful:
- Cookie Scoop: For evenly portioned cookies that bake uniformly.
- Offset Spatula: Makes transferring cookies to the cooling rack easier.
Ingredients for the Chocolate Hershey Kiss Cookies
Each ingredient plays a key role in achieving the perfect balance of flavor and texture. Here’s a closer look:
- All-Purpose Flour: Provides the necessary structure. For best results, spoon and level the flour to avoid packing it too densely, which can lead to dry cookies.
- Unsweetened Cocoa Powder: Choose a high-quality, unsweetened cocoa powder to give the cookies their deep chocolate flavor. Natural or Dutch-processed cocoa works here, though Dutch will yield a darker, smoother result.
- Baking Soda: This leavening agent helps the cookies spread and rise just the right amount during baking.
- Salt: A pinch of salt sharpens and balances the sweetness of the cookie. Kosher or fine sea salt works well.
- Unsalted Butter: Softened to room temperature, butter contributes to the rich flavor and tender texture. Using unsalted allows you to control the salt levels precisely.
- Granulated Sugar: Adds sweetness and contributes to the cookie’s slight crispness.
- Brown Sugar: Provides moisture, enhances the chewy texture, and adds a subtle molasses note that pairs beautifully with cocoa.
- Egg: Acts as a binder and contributes to the cookie’s richness and structure. Make sure it’s at room temperature for easy incorporation.
- Vanilla Extract: Rounds out the flavor profile with warm, aromatic notes. Use pure vanilla extract for the best taste.
- Milk: Just a small amount to help bring the dough together. Whole milk works best, but any milk you have on hand will do.
- Hershey’s Kisses: The crowning jewel of these cookies. Unwrap them ahead of time for smooth, uninterrupted assembly. You can use classic milk chocolate or experiment with seasonal varieties (like peppermint or caramel-filled) for a twist.
Variations for Chocolate Hershey Kiss Cookies
A good recipe invites personalization. Here are some ideas to make these cookies uniquely yours:
- Add a Nutty Crunch: Stir in ½ cup finely chopped toasted nuts (pecans, walnuts, or hazelnuts) to the dough for extra texture.
- Holiday Flavors: Use flavored Hershey’s Kisses (like mint or hot cocoa) for a festive touch.
- Peanut Butter Chocolate Twist: Replace 2 tablespoons of butter with creamy peanut butter and use Hershey’s Peanut Butter Kisses for a delightful twist.
- Spiced Chocolate: Add ½ teaspoon cinnamon or a pinch of cayenne pepper to the dough for a warm, spicy chocolate note.
- Drizzle Finish: Once cooled, drizzle the cookies with melted white or dark chocolate for an elegant finish.
How to Make Chocolate Hershey Kiss Cookies: Step-by-Step Instructions

1. Prepare the Dry Ingredients
In a medium bowl, whisk together the flour, cocoa powder, baking soda, and salt. This ensures the leavening and flavorings are distributed evenly throughout the dough.
2. Cream the Butter and Sugars
In a large mixing bowl, use an electric mixer to beat the softened butter, granulated sugar, and brown sugar together on medium speed. Continue until the mixture is light and fluffy, about 2-3 minutes. This step incorporates air, which helps create a tender, light texture.
3. Add the Egg and Vanilla
Crack in the egg and pour in the vanilla extract. Beat until fully incorporated. The mixture should look creamy and smooth.
4. Combine Dry and Wet Mixtures
Gradually add the dry ingredients into the wet mixture. Use a mixer on low speed or a spatula to combine until no dry streaks remain. Be careful not to overmix, as this can make the cookies tough.
5. Add the Milk
Drizzle in the milk, just enough to help bring the dough together. The dough should be soft but not sticky.
6. Chill the Dough
Cover the dough with plastic wrap and refrigerate for at least 30 minutes. Chilling firms the butter, which helps control spreading during baking and enhances the cookie’s texture.
7. Preheat the Oven
While the dough chills, preheat your oven to 350°F (177°C). Line two baking sheets with parchment paper or silicone baking mats.
8. Scoop and Shape the Dough
Using a spoon or cookie scoop, form dough balls about 1.5 tablespoons in size. Roll each ball in granulated sugar for a sparkling exterior, if desired. Place them about 2 inches apart on the prepared baking sheets.
9. Bake the Cookies
Bake for 10-12 minutes, or until the edges look set but the centers are still soft. The cookies will continue to set as they cool.
10. Press in the Hershey’s Kisses
As soon as the cookies come out of the oven, gently press a Hershey’s Kiss into the center of each cookie. The warm cookie will slightly melt the chocolate base, securing it in place.
11. Cool the Cookies
Allow the cookies to cool on the baking sheet for 5 minutes, then transfer to a wire rack to cool completely.
Serving and Decoration Ideas
- Classic Presentation: Serve cookies as they are, with the signature Hershey’s Kiss standing proudly in the center.
- Holiday Flair: Use colored sugar for rolling or seasonal Kisses (like peppermint or caramel) for festive occasions.
- Elegant Drizzle: Once cooled, drizzle with melted white or dark chocolate for a professional finish.
- Cookie Platter: Arrange alongside other holiday cookies like sugar cookies, gingerbread, or snickerdoodles for a beautiful dessert spread.
Storing Chocolate Hershey Kiss Cookies
- Room Temperature: Store in an airtight container at room temperature for up to 5 days. Separate layers with parchment to avoid sticking.
- Freezing: Freeze baked cookies in a freezer-safe bag for up to 3 months. Thaw at room temperature. Alternatively, freeze the shaped, unbaked dough balls (without the Kisses) and bake from frozen, adding a couple of extra minutes.
- Keep Fresh: Store with a slice of bread or a piece of apple in the container to help maintain moisture.
Tips and Tricks for Success
- Don’t Overbake: The cookies should look slightly underdone in the center when you pull them from the oven. This ensures a soft, chewy texture.
- Chill the Dough: Don’t skip the chilling step. It helps prevent the cookies from spreading too much during baking.
- Use Room Temperature Ingredients: This helps everything blend smoothly and creates a more uniform dough.
- Prep the Kisses: Unwrap them before baking so you can press them into the cookies as soon as they come out of the oven.
Nutrition (per cookie)
| Nutrient | Amount |
|---|---|
| Calories | 135 |
| Total Fat | 7g |
| Saturated Fat | 4g |
| Cholesterol | 15mg |
| Sodium | 50mg |
| Total Carbohydrates | 18g |
| Dietary Fiber | 1g |
| Sugars | 12g |
| Protein | 2g |
| Calcium | 10mg |
| Iron | 0.8mg |

Chocolate Hershey Kiss Cookies
Course: Appetizers24
cookies20
minutes10
minutes135
kcal30
MiniutesIngredients
1 1/4 cups all-purpose flour
1/2 cup unsweetened cocoa powder
1/2 teaspoon baking soda
1/4 teaspoon salt
1/2 cup unsalted butter, softened
1/2 cup granulated sugar (plus extra for rolling)
1/2 cup packed light or dark brown sugar
1 large egg
1 teaspoon vanilla extract
2 tablespoons milk
24 Hershey’s Kisses, unwrapped
Directions
- In a medium bowl, whisk together flour, cocoa powder, baking soda, and salt.
- In a large bowl, beat butter, granulated sugar, and brown sugar until light and fluffy (2-3 minutes).
- Add egg and vanilla; beat until smooth.
- Gradually mix in the dry ingredients. Add milk and mix until dough forms.
- Chill dough for at least 30 minutes.
- Preheat oven to 350°F (177°C). Line baking sheets with parchment.
- Scoop dough into 1.5-tablespoon balls, roll in extra sugar, and place 2 inches apart on sheets.
- Bake for 10-12 minutes. Press a Hershey’s Kiss into each cookie immediately.
- Cool on the sheet for 5 minutes, then transfer to a rack to cool completely.
Chocolate Hershey Kiss Cookies FAQs
Q: Can I use different flavors of Hershey’s Kisses?
A: Absolutely. Try peppermint, caramel, or even dark chocolate Kisses for a twist.
Q: My cookies are spreading too much. What can I do?
A: Ensure your butter is softened, not melted. Chilling the dough and using parchment paper or silicone mats helps control spreading.
Q: Can I make the dough ahead?
A: Yes. The dough can be refrigerated for up to 48 hours or frozen for up to 3 months.
Conclusion
These Chocolate Hershey Kiss Cookies blend rich cocoa with a soft, chewy base, topped by a creamy Hershey’s Kiss for the perfect finishing touch. Simple yet satisfying, they’re a classic that brings smiles to every table. Whether you’re baking for holidays, gifting to friends, or simply treating yourself, this recipe delivers consistent, delicious results.